How to upload financial documents?
 For a detailed information on documents please read Financial Documents and Accounting Software Types
 Only a user in the Preparer has the rights to upload documents for an assessment.
1. To upload the financial documents, when in an assessment, click on the Documents tab. You are shown the below selections
- Financial
Statement
- Management Accounts (*)
- Ledger
- Fixed Asset Register
2. You have an option to either upload the documents directly or request documents from the client directly from within the tool
3. When the documents need to be requested from the
client, click on ASK FOR ALL DOCUMENTS button. This opens a dialog box with the
email address of the client and an editable message requesting for the
documents. 
4. Uncheck the email addresses you do not want to send the message to. You can also add in other email addresses in Other boxes. Once done, click on the SEND button. This sends out an email to the client and a request to the Client portal of AI.TaxAssist. The
stage changes to Awaiting Financials.
5. When the client clicks on the link in his email, he/she will be directed to the AI.TaxAssist portal and can log in to see notifications in the top menu bar. Clicking on the notifications the client can upload the necessary documents. Once the documents have been
uploaded by the client, they appear on the Preparer’s portal and the stage
changes to Review Financials. 
6. If you choose to procure the financials outside of the tool (e.g over email from client), you can directly upload the documents by clicking the SELECT FILE and UPLOAD buttons. 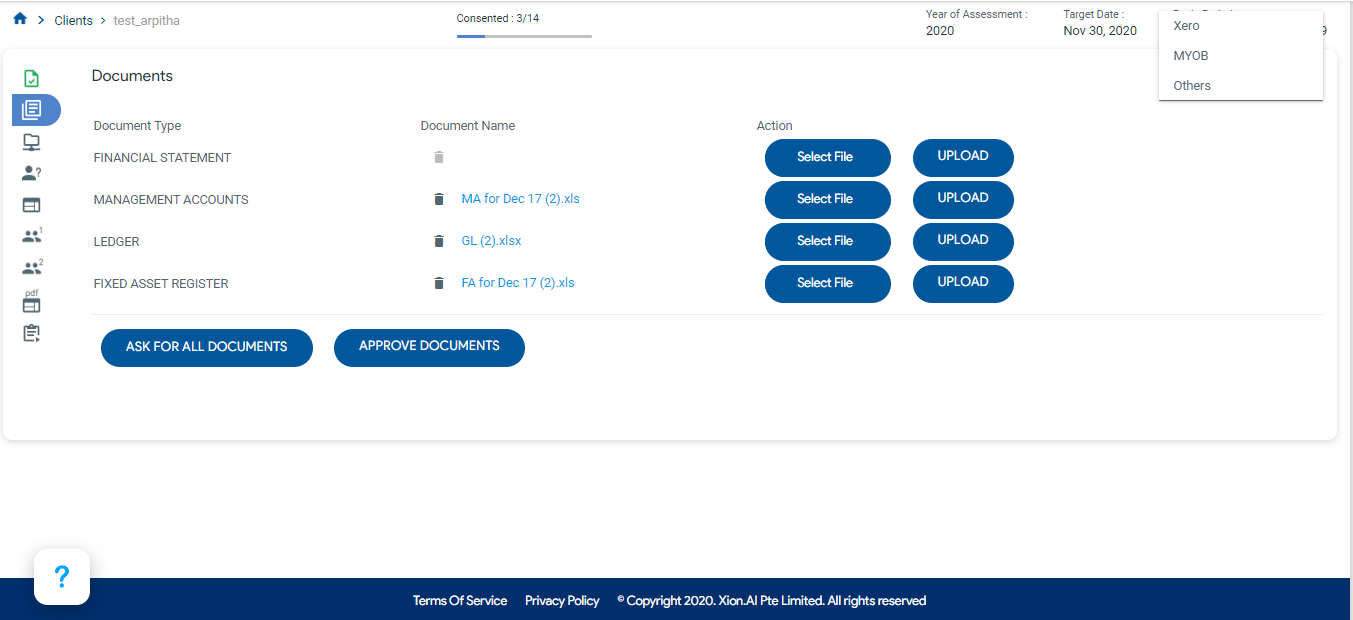
7. The next step is to choose the Software Type at the top right of the screen. This dropdown box shows MYOB, XERO, Quickbooks and ACCPAC. Please click on the software type that the documents uploaded belong to. If your documents do not belong to any of the software types that we support, please click on the Assist Me button to place a request for Managed Ipload where in we will help read in your documents accurately into the Workspace. More information about Managed Upload is available further down in this article.
8. Once the software type is selected, click on APPROVE DOCUMENTS button. The system then processes the documents and comes up with
intuitive tax classifications that are then displayed in the workspace when
ready. When the workspace is ready, the stage changes to Review Workspace.
Note: The processing time for the
system is about 30 seconds. Please wait for the Done! message to see the Workspace
populated.Note: If you would like to
re-upload a different document, you can click on the delete icon next to the
document in the Documents tab and upload a new file.
Managed Upload
This is a service that we now support to help you with reading in your documents accurately into your Workspace. You can avail this service when you do not know the software type of the financials you are uploading or if the documents are not read in correctly even for a supported software type.
In order to place a request for managed upload, follow the steps below,
- Click on the Assist Me button in the Documents tab.
- A dialog box as shown below will appear. Please fill in the reason for your request and click on the Submit button.
- This will send a request to us with your assessment details.
- We will have your financials read in and your Workspace ready to use within 24 to 48 hours.

What's Next?
You have the documents put in. Now let's check out the cool features of the Workspace in Tax Classification Tab.
Related Articles
Financial Documents
Document upload fails. - If the P/L, Ledger and the FA have more than one sheet (tab) in the file, we would require one of the sheets to be labelled PL for P/L, GL for Ledger and FA for Fixed Asset Register. I uploaded the wrong document. Can I ...Financial Documents Required
In order to produce the tax computation, AI.Taxassist system requires a few financial documents from your client. The documents required are listed below, Note: General Ledger should only contain P/L items. No items from Balance Sheet should be ...Guidelines for Format of Financial Statements
This article lists all the rules that must be followed before you upload documents into the AI.TaxAssist tool. 1. Select the correct source accounting software of the financial documents in the system Refer to articles here for the procedure to ...Xero Financial Statements
This document describes the steps to download the PL, GL and FA statements from your Xero account. The general format for the statements from Xero is also listed here. Files in this format will be read in by the AI.TaxAssist tool when you choose ...Quickbooks Financial Statements
This document describes the steps to download the PL and GL statements from your Quickbooks account. The general format for the statements from Quickbooks is also listed here. Files in this format will be read in by the AI.TaxAssist tool when you ...